Keto chicken pot pie lovers, rejoice: this easy, creamy recipe delivers all the warm, nostalgic flavor of a classic—plus 9 low-carb spin-offs, exact macros, freezer tips, and crust options so you can enjoy cozy dinners that stay keto-friendly.
Who says keto has to be boring? If you’re craving the warm, fuzzy hug of a classic chicken pot pie, you’re not alone — those savory, creamy, carb-packed dishes are literally designed to tug at our comfort cords. The good news: you can absolutely keep the comfort while swapping out the carbohydrate culprits. This article gives you a reliable keto chicken pot pie blueprint plus variations, macro guidance, make-ahead/freezer tips, and publishing advice if you want to share the recipe online.
What keto actually means
“Keto” is a very-low-carb, higher-fat way of eating that shifts your body into a metabolic state called ketosis, where it burns fat for fuel instead of glucose. That shift is what gives people many of keto’s claimed benefits — from faster initial weight loss to better blood sugar control for some folks.
Most people aiming for nutritional ketosis keep carbs quite low — commonly in the neighborhood of 20–50 grams of carbs per day — so even one serving of a traditional pot pie can blow a big chunk of your daily allowance if you don’t swap the crust and starchy veggies.
Why we crave comfort foods (and why that matters for keto)
Comfort foods hit multiple buttons at once: nostalgia, fat-and-salt reward chemistry, and fast sensory gratification. They tug on the brain’s reward pathways, especially when we’re stressed, tired, or emotional — which is why you might reach for a pie on a rough day. Understanding the emotional side of eating makes it easier to design keto-friendly swaps that actually satisfy your cravings.
The promise (so you know what you’ll get)
Read on, and you’ll get:
- A comprehensive, tested Keto Chicken Pot Pie recipe with precise weights and simple substitutions for crusts (fathead, biscuit-style, and crustless).
- Practical macros and portion tips to help the pie fit into your daily carb goal.
- Make-ahead, freezing, and reheating guide to make the recipe work for busy weeknights.
- Allergy-friendly and dairy-free options, plus fun variations (buffalo, seafood, mini ramekins).
A short scientific callout (keeps it real)
Keto can offer benefits — and it can pose risks depending on individual health conditions. Clinical reviews show useful outcomes for weight loss and some metabolic markers, but experts also advise monitoring electrolytes, kidney function, and cholesterol, and consulting a healthcare provider before starting if you have preexisting conditions. In short, keto works for many people, but smart planning and portion control are essential.
Ready to build a pot pie that comforts and keeps your carbs in check? Let’s walk through how to keep the creamy heart of the dish while swapping smartly for low-carb ingredients — starting with the filling, thickeners, and crust options that actually taste like the real thing.
Quick Keto Primer (for readers who need it)
If you’ve skimmed keto articles before and felt overwhelmed, this little primer gets you up to speed fast — no jargon, just the essentials you actually need to make this recipe work on your plan.
What is keto/ketosis? — three short bullets
- Very low-carb, higher-fat eating: The ketogenic diet sharply reduces carbohydrates and increases fat, so the body shifts fuel sources. (1)
- Ketosis = fat →ketones: When carbs are low, your liver makes ketone bodies from fat, and your cells use ketones for energy instead of glucose. That metabolic shift is called ketosis. (2)
- Moderate protein, plenty of fat: Keto is not “eat unlimited protein.” Protein stays moderate, so fat remains the main calorie source. Exact ratios vary by plan and goals.
Typical carb limits people use (simple rules of thumb)
- Most common target: ~20–50 grams of total carbs per day is the range many people use to reach and keep ketosis. If you’re new, aim toward the lower end (around 20–30 g) and test how your body responds. (3, 4)
- Net carbs vs total carbs: Some track net carbs (total carbs minus fiber and certain sugar alcohols). Be deliberate about which method you use and stay consistent. (5)
Common pitfalls (so your pot pie doesn’t sabotage your carbs)
- Hidden carbs are everywhere. Sauces, condiments, “low-carb” packaged foods, restaurant dishes, and some sugar-free labels (because of sugar alcohols or maltodextrin) can add surprising carbs. Read labels and beware ambiguous terms like “natural flavors” or “fiber added.” (6, 7)
- Protein paranoia — but don’t ignore it. The popular claim that any extra protein will automatically kick you out of ketosis is overstated. Your body can convert amino acids to glucose (gluconeogenesis), but whether that meaningfully disrupts ketosis depends on total calories, insulin response, and individual metabolism. In practice, keep protein moderate (not tiny, not huge) and prioritize fat for energy. (8, 9)
- Portion creep. A single slice of “comfort food” can contain far more carbs than you expect (especially if it has a pastry crust or starchy vegetables). Measure portions, and if you serve others, plate your portion first.
Quick takeaways (so you can cook confidently)
- Aim for 20–50 g carbs/day, depending on how strict you want to be.
- Track carefully at first — check labels, avoid hidden sources, and keep protein moderate so fat remains your primary fuel.
Want a one-line cheat? Treat your plate like a triangle: mostly fat, moderate protein, tiny starchy bits. Now we can build a pot pie that fits that triangle — creamy, cozy, and keto-safe.
What Makes a “Classic” Chicken Pot Pie? (Anatomy)
Think of a chicken pot pie like a tiny, edible house: it has a foundation, walls, a cozy filling, and a roof that seals everything in. Nail each layer, and you get comfort-food perfection. Miss one, and the result is soggy, bland, or too starchy. Below, I break down the anatomy — what each layer does, what the traditional ingredients are, why they’re a keto problem, and simple keto-friendly swaps and tips so you keep the soul of the dish without the carb hit.
The Base / Filling (the “foundation”)
- What it is: the warm, savory body of the pie — chicken, vegetables, and the sauce that binds them.
- Classic ingredients: shredded or cubed chicken, peas/carrots/potatoes, onions, celery, and a flour-thickened white sauce (béchamel-style).
Why it’s a keto challenge:
- The traditional filling often uses a roux (butter + flour) to thicken the sauce → flour = high carbs.
- Starchy veggies (potatoes, carrots, peas) balloon the carb count fast.
- The velvety mouthfeel of a classic béchamel comes from starch gelatinization — replicating that texture without starch requires strategy.
Keto swaps & tips:
- Replace flour roux with low-carb thickeners: a tiny amount of xanthan gum (start with ¼–½ tsp sprinkled in while whisking), cream cheese, mascarpone, or a reduction technique (simmer to concentrate). These give body without carbs.
- Use low-carb veg: riced cauliflower, zucchini cubes (lightly blanched), green beans, or a small amount of diced turnip. If you miss sweetness and color, a few diced, blanched baby carrots can be added sparingly and counted toward your carbs.
- Boost richness with extra butter, heavy cream, or a spoonful of grated parmesan — fat = flavor and helps satisfy the comfort-food cravings.
- Pre-cook and drain vegetables well so they don’t release excess water into the sauce (a common cause of sogginess).
Quick technique tip: whisk xanthan into cold cream or broth first to prevent clumping, then bring gently to a simmer — it thickens fast.
The Binder / Thickener (the glue)
- What it is: the ingredient that turns broth and dairy into a clingy, spoonable gravy.
- Classic ingredients: flour or cornstarch (roux or slurry).
Why it’s a keto challenge:
- Flour and cornstarch are high in digestible carbs and utterly non-keto in typical quantities.
- Many home cooks rely on those starches for a foolproof texture — removing them needs a reliable low-carb replacement.
Keto swaps & tips:
- Xanthan gum: very potent — a little goes a long way. Use it sparingly to avoid a gummy texture (start with ¼ tsp for ~3 cups of liquid).
- Cream cheese/mascarpone: melt-in, creamy binders that also add richness. Great if you want a silky, dairy-forward gravy.
- Egg yolk liaison: tempering an egg yolk into hot cream can thicken and add silkiness (works best for stovetop, not for very long simmering).
- Reduced cream technique: simmer the broth/cream mixture until it reduces by ~25–30% — concentrated liquids naturally thicken and become more flavorful.
- Be mindful: some “natural” thickeners like arrowroot or tapioca work well but are high in carbs — not keto-friendly.
Practical rule: test thickness by spooning — it should coat the back of a spoon, not run off immediately.
Vegetables (the texture + flavor layer)
- What it is: the color, bite, and textural contrast — think carrots, peas, potatoes in the classic.
- Classic ingredients: carrots, peas, potatoes, sometimes mushrooms or celery.
Why it’s a keto challenge:
- Carbs add up quickly with peas, potatoes, and even carrots if used liberally.
- Some vegetables release water while cooking, diluting the sauce and creating sogginess under the crust.
Keto swaps & tips:
- Swap starchy veg for riced cauliflower (mimics small diced potatoes), diced zucchini (drain or sauté first), green beans, mushrooms, and celery.
- Treat peas as optional or use a very small portion — they’re the classic but also one of the higher-carb pot-pie veggies.
- Par-cook or sauté vegetables first to drive off water; this concentrates flavor and prevents the filling from becoming watery.
- Use small dice to preserve the familiar pot-pie mouthfeel — big chunks feel less like the classic.
Protein (the star)
- What it is: shredded or cubed chicken is most common; turkey or leftover roast chicken works too.
- Classic ingredients: white meat or a mix of white + dark meat.
Why it’s a keto challenge:
- Protein itself isn’t “carby,” but dry protein makes the pie feel less indulgent. Many recipes overcompensate with starchy binders to mask dryness.
- Overcooking lean protein can zap moisture and make the filling feel less comforting.
Keto swaps & tips:
- Use dark meat (thighs) or a mix of dark + white for juicier results. Rotisserie chicken is a time-saver and adds flavor.
- Poach or roast the chicken with aromatics so it contributes to the sauce’s flavor (don’t just toss in dry-cooked chicken).
- Keep bite-size pieces consistent so each spoonful gets a balance of protein and saucy veg — texture matters.
Pro tip: if you want extra fat (and flavor), fold in crispy bacon or pancetta bits into the filling.
Pastry / Top (the roof)
- What it is: the crust — thin, flaky pastry that browns and gives that satisfying tear-and-eat pleasure.
- Classic ingredients: all-purpose flour, butter (for flaky layers), and sometimes egg wash for gloss.
Why it’s a keto challenge:
- Traditional pastry = lots of carbs (wheat flour) and is a primary source of “net carbs” in the dish.
- The tactile pleasure of real pastry — flakiness and a light crumb — is tough to replicate with nut or cheese-based crusts.
Keto swaps & tips:
- Fathead crust (mozzarella + cream cheese + almond flour + egg) gives a surprisingly pastry-like chew and browning — best used as a top crust.
- Almond-coconut pastry: Use almond + coconut flours with butter and egg for a tender, more neutral-tasting crust.
- Cheddar drop-biscuit topping: mixes cheddar, egg, and almond flour and is baked as spoonable dumplings on top — fast and delicious.
- Crustless option: bake the filling in a gratin dish and add a cheese crisp or herb crumble on top for crunch without crust carbs.
- To avoid sogginess: blind-bake a thin base, or brush the inside of the crust with beaten egg and briefly roast to seal before adding filling.
Texture note: most keto crusts will taste a bit different from wheat pastry (cheesy, nutty, or denser), so match expectations — the goal is satisfying comfort, not perfect mimicry.
Why each element creates a keto problem (summary)
- Flour & roux: fast, reliable thickeners — but high in digestible carbs.
- Starchy veg (potatoes, peas, carrots): iconic pot-pie flavor, but carb-dense.
- Pastry: the biggest carb offender — wheat flour is the primary reason pot pies spike carbs.
- Moisture balance: classic methods tolerate water from starch and pastry; low-carb swaps change water behavior and need adjusted technique (par-cook veg, pre-thicken sauce).
Practical, layer-focused checklist for a keto pot pie that actually sings
- Pre-cook and drain veg to limit water.
- Use a fat-forward binder (cream cheese, heavy cream, or reduced broth) + a touch of xanthan to mimic a roux.
- Choose a crust style that fits your goal: fathead for a pastry-like top, drop biscuits for easy comfort, or crustless for the lowest carbs.
- Season boldly — herbs, a splash of acid (lemon or vinegar), and umami (mushrooms, parmesan, bacon) make low-carb fillings feel decadent.
- Portion consciously — even low-carb crusts add calories; dividing the pie into 6–8 smart servings preserves ketone-friendly macros.
Final thought
Understanding the role each layer plays — and why the classic versions are carb-heavy — lets you be surgical about swaps.
Want the same creamy, cozy pot pie experience? Keep the sauce rich, the veg smart, and the crust intentional.
The result: a Keto Chicken Pot Pie that delivers nostalgia without blowing your carb budget.
Keto Strategy: How to Keep the Comfort, Lose the Carbs
You can keep everything you love about comfort food — creaminess, mouthfeel, warm savory notes — while cutting the carbs that break a keto day. The secret is being intentional about each component: reduce starch, swap high-carb flours, choose low-carb thickeners, and lean into high-fat ingredients that add flavor and satiety. Below you’ll find practical tactics, a compact comparison table of thickeners, and short examples for when to use each method.
High-level strategies (quick checklist)
- Reduce starch: Replace potatoes, thick gravy roux, and heavy pea/carrot load with low-carb veg and concentrated sauces.
- Swap flours: Don’t reach for all-purpose flour — use almond flour, coconut flour, or cheese-based crusts (e.g., fathead) instead.
- Use low-carb thickeners: Xanthan gum, cream cheese, mascarpone, or reduced heavy cream give body without big carb hits.
- Leverage fat for comfort: Butter, heavy cream, cream cheese, mascarpone, and nut-based crusts add mouthfeel and keep you full — and that sensory fat helps satisfy cravings.
- Control moisture: Par-cook and drain vegetables so they don’t water down the sauce and make the crust soggy.
- Portioning: Even low-carb crusts add calories; divide the pie into 6–8 portions to control energy and carb density.
Comparison table: Thickening methods (quick at-a-glance)
| Thickener | Carb impact (relative) | Texture it gives | Pros | Cons | Typical use case |
|---|---|---|---|---|---|
| All-purpose flour (traditional) | High | Smooth, classic gravy | Foolproof, familiar | High carbs — not keto | Avoid for keto |
| Cornstarch / arrowroot (slurry) | High | Glossy, clear gravy | Easy to use, predictable | High carbs — not keto | Avoid for keto |
| Xanthan gum | Very low | Smooth, slightly glossy; can be viscous if overused | Extremely low-carb; tiny amounts thicken a lot; stable on cooling | Easy to overdo — gummy if too much; needs careful whisking | Best for stove-top sauces — use very small amounts |
| Cream cheese / mascarpone | Low (mostly fat) | Velvety, rich, dense | Adds flavor & body; doubles as flavor booster | Can be heavier mouthfeel; dairy | Ideal for creamy, rich fillings |
| Cauliflower purée | Low–moderate | Chunky to smooth depending on blending | Low-carb veg option; adds bulk and body | Can alter flavor; may need extra fat for silkiness | Great for “potato-like” texture with more bulk |
How to use each thickener — short examples & when to pick them
1. Xanthan gum — the molecular magician
- How it works: A tiny amount swells and thickens liquids. It’s powerful: start small and add more if needed.
- Example: For ~2–3 cups of sauce, start with about ⅛ teaspoon blended into a small amount of cold liquid, then whisk into the hot sauce and simmer 30–90 seconds.
- When to use: When you want a low-flavor, low-calorie binder that preserves the flavor profile and keeps carbs minimal — ideal for keto pot pie gravies.
- Warning: Overdo it, and the sauce becomes slimy/gummy. Add slowly and test.
2. Cream cheese/mascarpone — rich, forgiving, tasty
- How it works: These cheeses melt into hot liquids to create a thick, creamy emulsion. They also add fat and umami.
- Example: Soften 1–2 ounces of cream cheese into a cup of warm cream/broth, whisk until smooth, then combine with the rest of the filling.
- When to use: If you want richness and silkiness plus added calories that help satiety — great for freezer-friendly pies and for diners who like a decadent filling.
- Warning: Adds dairy; not ideal for strict dairy-free diets.
3. Cauliflower purée — the vegetable thickener
- How it works: Riced cauliflower cooked and puréed gives bulk and a soft, almost potato-like bite. It thickens by adding solids rather than binding liquids.
- Example: Steam ~150–200 g riced cauliflower, blend with a splash of broth until smooth, fold into the filling to replace potatoes.
- When to use: When you want volume and a “starchy” mouthfeel without starch. It’s also a good option if you want to keep ingredients whole foods.
- Warning: Can mute flavors; boost with butter, parmesan, or herbs.
4. Reduction (simmer to concentrate)
- How it works: Simmer liquids to evaporate water and concentrate proteins and fats — this thickens naturally.
- Example: Simmer your chicken broth + cream until reduced by ~20–30% before adding chicken and vegetables.
- When to use: When you have time and want pure, natural thickening without additives. Great for flavor depth.
- Warning: Takes time and attention; risk of over-reducing and making the sauce overly salty or intense.
5. Egg yolk liaison (gentle thickening)
- How it works: Temper egg yolk into hot liquids to create a silky, custard-like binder.
- Example: Beat 1 yolk with a tablespoon of warm liquid, slowly whisk into the warm sauce off heat, then return briefly to low heat to thicken.
- When to use: For small batches where you want luxurious silkiness (best in stove-top fillings).
- Warning: Needs careful tempering to avoid scrambled bits; not ideal if reheating multiple times.
Quick recipe tips
- Use a combo approach: e.g., reduce the broth slightly, add 1 oz cream cheese, and a whisper of xanthan (⅛–¼ tsp) for a stable, luscious sauce that tolerates reheating and freezing.
- Par-cook and drain veg to prevent extra water. That allows you to use less thickener.
- Taste and texture test: spoon the sauce on a plate — it should hold, coat, and not run like broth. If it slides off immediately, it needs more thickening or reduction.
Short wrap
For a keto pot pie that still feels indulgent, don’t rely on a single trick — combine reduction, a creamy binder (cream cheese or mascarpone), and a touch of xanthan gum for stability. Swap starchy veg for cauliflower or zucchini, and use fat-forward flavors that crave — without the carb fallout.
Crust Options: 4 Low-Carb Paths (and when to choose each)
When it comes to keto pot pie, the crust is where the emotional payoff lives — golden, tearable edges, buttery crunch, or pillowy biscuit tops. Below are four battle-tested low-carb crust directions, when to pick each one, and practical texture, ratio, bake, and troubleshooting tips so you don’t end up with a gluey dome or an oily brick.
Fathead crust (mozzarella + almond flour) — pros/cons
Why choose it: Fathead is the go-to when you want a true“pie” moment: golden browning, pliable dough you can roll, and a slightly chewy, almost pastry-like bite. It browns beautifully and seals in steam well — great for a top crust or handheld mini pot pies.
Basic ratio (single top crust for a 9-inch pie):
- 1 ½ cups shredded mozzarella (≈150 g)
- 2 tbsp cream cheese (≈30 g)
- 1 large egg, beaten
- ¾ cup almond flour (≈75–90 g; brands vary)
- ¼ tsp baking powder (optional, light lift)
- Pinch of salt
Bake temp & time: 200–220 °C (400–425 °F). Bake 18–25 minutes until puffed and golden (watch closely — cheese browns fast).
Texture tips:
- The dough is tacky and elastic — press between two sheets of parchment to roll it thin.
- It bakes into a chewy, slightly cheesy crust with a golden top and soft interior. For crisper edges, brush with beaten egg and bake a few extra minutes on the bottom rack for browning.
Pros:
- Low net carbs, good structure, browns/looks like a “real” crust.
- Easily scaled for individual pies or a large top.
Cons:
- Cheesiness is detectable — not a neutral wheat pastry mimic.
- Overworked dough becomes dense; under-baked dough is gummy.
- Can release a bit of oil if the cheese gets very hot — use moderate oven temps and don’t overbake.
Troubleshooting:
- Crust too gummy/sticky: Either it needs a bit more almond flour, or it’s underbaked. Slide the whole pie onto a preheated baking sheet to crisp the bottom.
- Crust oozing oil: Cheese got too hot; lower oven temp by 10–20 °F and bake a bit longer, or add 1–2 tbsp extra almond flour to absorb moisture next time.
- Dough tears while rolling: Press between parchment and roll gently; if still tearing, chill 10–15 minutes to firm the dough.
Almond-coconut flour pastry — tips for flakiness
Why choose it: Want a lighter, less cheesy crust that leans closer to a tender pastry? Almond + coconut flour pastry produces a softer, crumbly crust (more “shortcrust” than puff) and is excellent when you want a neutral flavor that lets the filling sing.
Basic ratio (single pie crust):
- 2 cups almond flour (≈200 g)
- 2–3 tbsp coconut flour (start with 2 tbsp; coconut is highly absorbent)
- 6–8 tbsp (¾–1 stick) cold butter, diced (≈85–110 g) — or ghee for less water
- 1 large egg (or 1 egg + 1 tbsp cold water) to bind
- 1 tsp vinegar or lemon juice (helps tenderize)
- Pinch of salt
Bake temp & time: 190–200 °C (375–400 °F). Blind-bake 8–10 minutes for a bottom seal, then add filling and bake another 20–25 minutes until the top is golden.
Texture tips for flakiness:
- Cold butter: Dice and keep it cold — the little pockets of fat make flake-like layers when they melt.
- Don’t overwork: Mix until just combined; overmixing hydrates flours and creates density.
- Add liquid gradually: Coconut flour soaks — add egg/water stepwise so you don’t over-hydrate.
- Rest & chill: Chill the dough 20–30 minutes before rolling to firm the butter and relax the flours.
Pros:
- More neutral flavor than Fathead; works well if you don’t love cheese notes.
- It can be made more tender/flaky by increasing the butter.
Cons:
- Coconut flour can make the crust dry/crumbly if mis-measured.
- Slightly higher calorie density; texture is short (crumbly) rather than layered like butter-laminated pastry.
Troubleshooting:
- Crust crumbles when cut: Add a tiny bit more binder (1 tsp honey is not keto — avoid; use an extra beaten egg or a tsp of psyllium husk gel). Next time, decrease the coconut flour or add 1 tbsp extra butter.
- Soggy bottom: Blind-bake the base 6–8 minutes and brush with a thin egg wash or melted butter to seal before adding filling.
- Crust too oily: Reduce butter by 1 tbsp and add 1 tbsp more almond flour.
Biscuit or cheddar biscuit topping (drop biscuits)
Why choose it: Fast, comforting, and delicious — drop biscuits (think spoon-on cheesy dumplings) are perfect if you want rustic charm with minimal rolling or handling. They’re especially great for casseroles, mini pies, or when you want a softer, pillowy bite.
Basic ratio (enough for 8–10 biscuits on a 9-inch pie):
- 1 ½–2 cups almond flour (≈150–200 g)
- 1–1 ¼ tsp baking powder
- 1–2 cups shredded cheddar (or mix cheddar + parmesan) — adjust for cheesiness and structure
- 2 large eggs (or 1 egg + ¼ cup sour cream for extra tenderness)
- Salt & garlic powder to taste
- Optional 1–2 tbsp melted butter for richness
Bake temp & time: 190–200 °C (375–400 °F). Drop spoonfuls over the hot filling, then bake 18–25 minutes until biscuits are puffed and golden.
Texture tips:
- Cheese acts as a binder and browns crisply on the outside while the inside stays tender.
- Don’t overmix — gentle fold keeps biscuits light.
- For browned tops, switch to broil for the last 1–2 minutes (watch like a hawk).
Pros:
- Quick and forgiving — no rolling, no chilling required.
- Cheesy, soft texture pairs amazingly with creamy fillings.
Cons:
- Not a pastry look; more rustic.
- It can be dense if too much almond flour is used or overmixed.
Troubleshooting:
- Biscuits dense/not rising: Check baking powder freshness; add an extra ¼–½ tsp if needed. Avoid overpacking the spoonfuls.
- Biscuits fall flat: The filling might be too hot and collapse them — cool filling slightly before dropping biscuits, or bake filling briefly before adding biscuit topping.
- Biscuit edges are oily: Reduce added butter or use slightly less shredded cheese; pat excess oil before baking.
Crustless or casserole-style pot pie (when time/health matters)
Why choose it: Lowest carb, fastest, and easiest for batch cooking. Crustless is ideal if you’re watching calories, prefer fewer baked steps, or want a freezer-first strategy. It’s basically a creamy chicken casserole with a roasted-cheese or herb crumble on top.
How to assemble:
- Layer filling in a casserole dish, top with a thin parmesan crisp, shredded cheese + herb crumb, or almond-parmesan “crumb” (1/2 cup almond flour + ¼ cup parmesan + 1–2 tbsp melted butter) and bake until bubbly and golden.
Bake temp & time: 180–190 °C (350–375 °F) for 25–35 minutes until the center is hot and the top is browned.
Texture tips:
- Without crust, texture depends on the thickness of the sauce and the top layer. A crisp parmesan crust gives a crunchy contrast; a breadcrumb-style almond-parmesan topping gives a gentle crumble.
- Make the sauce slightly thicker than usual (reduce liquid or add a small amount of xanthan, 1/8–1/4 tsp) so the dish holds together when scooped.
Pros:
- Simplest and lowest-carb option.
- Great for meal prep and freezing in individual portions.
- Easier for dairy-free or nut-free adaptations (use coconut-based topping or roasted seeds).
Cons:
- Lacks the tear-apart pastry pleasure — more like a gratin.
- Presentation is less “pie,” so it’s better for family dinners than show-stopping blog photos.
Troubleshooting:
- Filling too runny without crust: Stir in 1/8–1/4 tsp xanthan or simmer to reduce excess liquid before baking.
- Top not crisping: Switch to broil for 1–2 minutes at the end, or use a higher ratio of cheese for the crisp.
- Dry casserole: Add a splash more cream or a beaten egg folded through the filling before baking to add silkiness.
Practical bake & texture troubleshooting (common cross-cutting issues and fixes)
- Soggy bottom under any crust: Par-cook/saute vegetables to remove excess water; blind-bake bottom or brush with beaten egg to seal; drain filling well before assembly.
- Crust browning too fast, filling undercooked: Tent with foil for the remaining time, or start at a higher temp for crust browning (e.g., 425 °F for 10–12 min), then reduce to 375 °F to finish cooking.
- Cheesy crust too oily: Lower oven temp slightly or add a bit more almond flour to the dough to absorb some fat. Also, to avoid overgrating very fine cheese (finer shreds melt faster and can pool oil).
- Crust cracks when slicing: Let the pie rest 10–15 minutes after baking; this lets the filling set and reduces tearing.
- Dense crusts or heavy biscuits: Check leavening (fresh baking powder), avoid overmixing, and measure almond/coconut flours by weight if possible — volume measures vary.
Quick decision guide (which crust to pick?)
- Want pastry-like look + rollable dough → Fathead crust.
- Want a neutral, buttery shortcrust → Almond-coconut flour pastry.
- Want fast, rustic, cheesy comfort → Cheddar drop biscuits.
- Want the lowest carbs & easiest meal prep → Crustless casserole with a crisp topping.
Choose the crust that matches the occasion: fathead for weekend showstoppers, drop-biscuits for cozy weeknights, almond-coconut pastry for guests who expect a tender top, and crustless when life gets busy, or carb limits are strict. Whichever route you take, follow the texture tips above, and you’ll deliver a pot pie that reads “comfort” on every spoonful — without the carb guilt.
Filling & Sauce: How to Build a Creamy Keto Pot Pie Base
The filling is the heart of any pot pie — it’s the flavor, the comfort, the spoonable part that makes you feel warm inside. On keto, the trick is to recreate that velvety, clingy sauce without a flour-based roux or starchy veg. Below you’ll find fat-forward binder options, practical ratios, step-by-step techniques, and troubleshooting tips so your filling is rich, stable, and freezer-friendly — all while staying low-carb.
The fat-forward binders that actually work
Keto building blocks for a creamy filling:
- Heavy cream — concentrates flavor and contributes silkiness when reduced. Use it as part of the liquid base. (10)
- Cream cheese — melts into sauces to create an emulsified, clingy texture; excellent for thickening and flavor. (11)
- Mascarpone or crème fraîche — gives an ultra-silky, neutral-flavored creaminess that won’t overpower herbs. Good when you want richness without a tang. (12, 13)
- Butter (finishing butter / beurre monté) — adds shine and mouthfeel; fold in off-heat for glossy texture. (14)
- Xanthan gum (micro amounts) — the most carb-friendly thickener: a little goes a very long way to stabilize and thicken without taste. Use sparingly to avoid a gummy texture. (15, 16)
Use these in combination rather than relying on a single trick — the synergy gives you body, flavor, and reheating stability.
A practical sauce formula (scales easily)
This is a reliable template to produce ~3 cups of thick, clingy sauce (enough for a 9-inch pie filling for 6 servings). Adjust by weight for precision.
- Liquid base: 1 cup chicken broth + 1 cup heavy cream (240 ml + 240 ml)
- Fat + flavor: 2 tbsp butter + 1–2 oz cream cheese (30–60 g)
- Optional richness boost: 1–2 tbsp mascarpone or grated parmesan (if you want umami)
- Thickener (micro): 1/8–1/4 teaspoon xanthan gum (start small)
- Aromatics & seasoning: 1 small onion (sautéed), 1 clove garlic, 1 tsp thyme, salt & pepper
Why this works: the broth + cream provide a flavorful liquid that reduces cleanly; cream cheese (and/or mascarpone) emulsifies fat into the liquid for a silky body; xanthan gives instant stability so the sauce clings to chicken and veg instead of pooling. (17)
Step-by-step technique — build the velvety mouthfeel
Follow this order, and you’ll avoid curdling, graininess, and gluey textures.
- Sauté the flavor first. Gently sauté diced onion, celery, and any low-carb veg (zucchini, riced cauliflower lightly sautéed) in butter until softened; season early so flavors bloom. This gives a flavorful foundation.
- Add broth and reduce. Pour in the chicken broth and simmer briefly (2–5 minutes) to deglaze the pan and concentrate flavor. Reducing the liquid early means you’ll need less thickener later.
- Lower the heat and add dairy. Turn the heat to low. Stir in heavy cream slowly, then add softened cream cheese (cut into pieces) or mascarpone. Whisk constantly until the cheese melts completely and the sauce is smooth. High heat can make dairy separate — low & slow is the rule.
- Micro-thicken if needed. If you want extra cling, disperse xanthan gum first: mix 1/8 tsp xanthan into 1–2 tbsp of cold liquid (or oil) to prehydrate and prevent clumps, then whisk into the warm sauce. It will thicken rapidly within 30–90 seconds. Add tiny increments — it’s easier to thicken more than to fix an over-thickened, gummy sauce.
- Finish with butter and acid. Off the heat, swirl in 1 tbsp cold butter to add silk and gloss; finish with a squeeze of lemon or a splash of vinegar to brighten flavors (acids also help balance the richness). Taste and adjust salt/pepper.
- Fold in protein & veg. Mix shredded chicken and pre-cooked, drained vegetables into the sauce so each bite is coated. Let the filling cool slightly before topping with crust (if using) to prevent sogginess.
Temperature and timing notes (avoid grainy or split sauce)
- Don’t boil heavy cream aggressively. Rolling boils can separate emulsions; gentle simmering is fine.
- Temper eggs/yolks carefully. If you use yolk liaison (optional for silkiness), whisk yolk with a little warm liquid and slowly add warm sauce before returning to low heat briefly — avoid scrambling. (18)
- Add cheese to the heat when possible. Soften cream cheese first and melt it into warm (not scorching) liquid; this reduces lumps. A hand blender will make the sauce ultra-smooth.
Freezing & reheating behavior (practical guidance)
- Xanthan-thickened sauces are typically stable through freezing and thawing better than some starch-based thickeners, but extremely high xanthan concentrations can feel gummy after freezing; stick to micro-doses. (19)
- Cream-cheese-based sauces reheat well in a low oven (325–350°F / 160–175°C) covered, or gently on the stovetop over low heat, whisking to return the emulsion. Avoid high microwave heat, which can break emulsions.
- Mascarpone/crème fraîche holds up nicely to reheating and adds a forgiving texture for make-ahead meals.
Quick variations to tweak mouthfeel or flavor
- Ultra-silky: Replace half the cream with mascarpone and finish with butter. Great for “restaurant-style” richness.
- Lighter but still creamy: Use ⅔ broth + ⅓ heavy cream, increase cream cheese slightly, and thicken with 1/8 tsp xanthan. Lower calories but keep cling.
- Dairy-free: Use full-fat coconut milk + 2 tbsp cashew cream and thicken with 1/8–¼ tsp xanthan; note coconut flavor will be present, and carbs might be slightly higher depending on add-ins.
Troubleshooting (fast fixes)
- Sauce is too thin: Simmer to reduce more, or whisk in another tiny pinch of xanthan (¼ tsp max), or stir in an extra ounce of cream cheese.
- Sauce is gummy or slippery: You added too much xanthan; thin with a splash of warm broth/cream and whisk vigorously, or add more cream/cheese to rebalance. Taste: Xanthan can alter mouthfeel if overused.
- Cheese lumps: Use a hand blender to emulsify, or strain the sauce through a fine sieve if lumps persist. Next time, soften cheese thoroughly and add it off-heat.
Takeaway
Build the pot-pie sauce in layers: concentrate flavor with a short reduction, emulsify with cream cheese or mascarpone, micro-thicken with xanthan if needed, and finish with butter and acid — you’ll get the velvety, clingy mouthfeel of a classic pot pie without flour or starch.
Vegetable Choices & Low-Carb Substitutions
Veg gives pot pie its color, bite, and comfort — but a few classic choices (peas, carrots, potatoes) are the biggest carb culprits. Below, I break down the problem veggies with quick carb numbers, then give practical low-carb swaps, portioning rules, and cooking tips so your Keto Chicken Pot Pie stays creamy, satisfying, and within your carb budget.
Why peas, carrots, and potatoes are trouble
- Green peas: cooked peas contain roughly ~14 g total carbs per 100 g, which can add up fast if you use a cup or more. (20)
- Carrots: Raw carrots are about ~9–10 g total carbs per 100 g; a generous handful (one medium carrot) can take a noticeable bite out of a strict 20–30 g/day target. (21)
- Potatoes: white potatoes are very starchy — roughly ~17–21 g total carbs per 100 g depending on variety — so they’re effectively off-limits for strict keto servings. (22, 23)
(These are total carbohydrate figures from national food databases; remember that many keto followers use net carbs — total carbs minus fiber — when tracking, which changes the math slightly. See the “measuring portions” section.) (24)
Low-carb swaps that preserve texture & mouthfeel (and examples)
Swap smart: aim for veg that add bulk and “bite” but have much lower carbs per 100 g.
- Riced cauliflower — best potato stand-in. Cooked/riced cauliflower is low in carbs (roughly ~3–5 g total carbs / 100 g, with net carbs often ~1–3 g depending on prep) and mashes or dices into the sauce to mimic potato or small-dice texture. Use it for body, not as a direct 1:1 bulk swap for very sweet/starchy notes. (25, 26)
- Baby zucchini (small dice) — very low carbs (~3 g total carbs / 100 g) and keeps a pleasant bite after blanching or quick sauté. It gives fresh color and moisture without starch. (27, 28)
- Daikon or turnip (tiny amount) — both are root vegetables but lower in carbs than potato; use small dice and sparingly (e.g., 30–50 g) to get “rooty” flavor without a giant carb hit. Daikon ≈ 4 g total carbs / 100 g; turnip ≈ ~6 g total carbs / 100 g. (29, 30)
- Blanched green beans — a classic pot-pie texture substitute for peas; green beans are modest in carbs (~7 g total carbs / 100 g, with fiber lowering the net value). They add the snap and color that peas give, but with fewer carbs. (31)
- Parsnip — use sparingly — parsnip tastes starchy and sweet (like a carrot/potato hybrid) but is relatively high in carbs (~~16–18 g total carbs / 100 g cooked). Try a few small cubes for flavor if you’re not ultra-strict, but count them. (32, 33)
Short rule: favor cruciferous/soft summer-squash veg (cauliflower, broccoli, zucchini) for bulk; reserve starchy roots for tiny amounts only.
How to measure portions to control net carbs (practical method)
- Weigh, don’t guess. Use a kitchen scale — 100 g portions give you consistent carb math. USDA or FoodData Central entries are the best sources for ingredient-level carb numbers. (34)
- Calculate net carbs: for whole vegetables, subtract fiber from total carbs (net carbs = total carbs − fiber). For packaged ingredients with sugar alcohols, read the label (and follow rules for partial subtraction of some polyols). (35)
- Portion examples for a 1/6—1/8 pie serving (practical):
- Add the veg-carb tallies to your recipe macro calculation before you bake. If the total net carbs per serving edge above your personal target, reduce the portion of higher-carb veggies and add more low-carb filler (cauliflower, mushrooms, or extra chicken/fat).
Prep & cooking tips to keep texture and avoid sogginess
- Par-cook and drain riced cauliflower or zucchini: sauté briefly to release excess water, then pat dry. This prevents a watery filling that could force you to add extra thickeners.
- Small dice for texture mimicry: tiny, even pieces of zucchini or turnip give the same “bite” as carrots/potatoes.
- Freeze-friendly swaps: riced cauliflower and cooked green beans freeze and reheat well; avoid large amounts of raw soft squash in pies you’ll freeze (it can release water).
Protein Choices & Cooking Methods
Protein is the backbone of your pot pie — it supplies the savory heft, the satisfying chew, and the macros that matter on keto. Choosing the right cut and cooking method changes not only the flavor and moisture but also how the filling behaves (and how forgiving it is when you reheat or freeze). Below, I break down rotisserie, poached, and roasted/shredded chicken, why leftovers are your secret weapon, and the tradeoffs between white and dark meat (with practical tips, cook times, and macro-minded notes).
Rotisserie chicken — convenience + flavor (when time is short)
Why use it: pre-cooked rotisserie birds are fast, flavorful, and inexpensive — perfect for weeknight pot pies or batch cooking. They give you well-seasoned meat with a mix of dark and white meat already cooked through.
Tips & caveats:
- Pull meat warm from the bird and shred or dice. Reserve the carcass for stock (great for upping the flavor in your pot-pie sauce).
- Watch additives: many store rotisserie chickens are treated with phosphates or brines to lock in moisture and flavor — that’s convenient, but can change taste and sodium content (and some people notice an off-flavor from additives). If you prefer control, roast your own whole bird. (39)
- Use-case: fastest route to a weeknight pot pie; mixes of dark/white meat keep the filling moist.
Practical: one medium rotisserie chicken yields ~3–4 cups shredded meat (depending on bird size), enough for a 9″ pot pie for 6 servings.
Poached chicken — the juiciest, most foolproof option for tender bites
Why use it: poaching is a gentle, wet-heat method that keeps breast meat supremely tender and moist — ideal if you want pristine, shreddable white meat without drying. Serious Eats and other chefs recommend careful poaching for the most tender results. (40, 41)
How to poach (fast method):
- Place boneless chicken breasts (or thighs) in a single layer in a saucepan.
- Cover with cold water or low-sodium broth by ~1 inch and add aromatics (bay leaf, peppercorns, a halved onion, herbs).
- Slowly bring to a gentle simmer — do not boil. Once small bubbles appear, reduce the heat so it barely simmers and time 10–14 minutes for breasts (varies by thickness), 12–18 minutes for thighs.
- Remove from heat and let chicken rest in the liquid for 5–10 minutes (carryover cooking finishes gently).
- Drain, shred with forks, or cool and dice.
Why it’s great: poached chicken stays moist when folded into a creamy sauce (less risk of dry stringy meat). It’s also easy to portion control for macros. If you plan to freeze portions, poached meat holds up well. (42)
Roasted/shredded chicken — deeper flavor, better texture for browned fillings
Why use it: roasting adds Maillard browning and richer, roasted notes that translate into a more “homemade” pot pie. Roasting is great when you want a robust, savory base and can tolerate slightly drier breast meat (or use thighs to avoid dryness).
Tips:
- Roast a whole chicken or bone-in pieces at ~190–200°C (375–400°F) until internal temp reaches 74°C (165°F) for safety; thighs often finish at slightly higher temps for tenderness.
- Let the roasted bird rest 10–15 minutes before shredding to retain juices.
- Use skin-on dark meat for shredding if you want more fat and flavor in the filling (remove most skin if you want less surface fat in the pie).
Why it’s great: roasted chicken yields flavorful scraps for the filling and a carcass for a deeply flavored stock (boosts sauce without added carbs). Roasted dark meat is especially forgiving in reheating and freezing.
Shredding, dicing, and texture decisions
- Shredded chicken disperses through the filling and gives that classic pot-pie mouthfeel — use forks or a stand mixer on low for quick shredding.
- Diced chicken (½-inch dice) gives distinct bites of meat and looks chunkier in photos — use for a heartier texture.
- Pulled vs. cubed: pulled tends to hold sauce better; cubes keep structure. Think about the guest experience and reheating: shredded is generally more forgiving.
Using leftovers — how to repurpose and boost flavor
Leftover roasted or holiday turkey/chicken is perfect for pot pie. Best practices:
- Remove excess fat and large skin pieces to avoid a greasy filling.
- Reheat gently in the sauce rather than cooking meat again — you only need to warm it through to avoid drying.
- Stretch with low-carb veg like riced cauliflower to bulk up volume without raising net carbs much.
- Make stock from bones for a flavor-forward sauce base that’s keto-friendly and reduces the need to add extra salt or bouillon.
Dark meat vs. white meat — flavor, moisture, and macros
Short version: dark meat (thighs) = more fat, more flavor, more forgiving; white meat (breast) = leaner, higher protein, lower fat. Choose by your macro goals and texture preferences.
Quick macro snapshot (approximate per 100 g cooked):
- Chicken breast (skinless, roasted): ~165 kcal, ~31 g protein, ~3.6 g fat. (43)
- Chicken thigh (meat only, roasted): ~210–250 kcal, ~25–28 g protein, ~11–15 g fat (varies with skin on/off). Dark meat supplies more calories due to fat content. (44, 45)
What that means for keto:
- Use thighs if you want higher-fat, more satiating servings that fit keto without adding extra butter/cream. Thighs also tolerate reheating/freezing better without drying.
- Use breast if you’re counting calories or want higher protein with less fat — but pair it with extra butter/cream or a fatty crust to keep the pot pie indulgent.
Practical mix: a 50/50 blend of shredded thigh + breast gives good flavor, satisfying fat, and a solid protein hit while keeping texture varied.
Food-safety & finishing temps
- Always aim for a safe internal temp: 74°C (165°F) is the standard for cooked poultry. For pulled/shredded chicken reheated in sauce, ensure the center reaches a safe temperature again before serving. Use a probe thermometer for accuracy.
- When reheating frozen pot pies, thaw overnight in the fridge if possible; reheat covered in a 160–175°C (325–350°F) oven until internal temp is steaming hot (≥74°C) to preserve moisture and prevent overcooking.
Quick decision guide for your pot pie
- Fast + easy → rotisserie chicken.
- Silky, super-tender breast → poached chicken (best for a delicate filling).
- Deep roasted flavor → roast whole chicken or bone-in pieces and shred.
- Most keto-friendly without added fats → use thighs or a thigh/breast mix.
Dairy-Free, Egg-Free, and Allergy-Friendly Variations
Want a keto pot pie that’s dairy-free, egg-free, or nut-free? Totally doable. The trick is swapping the usual cream/cream-cheese/xanthan/egg-based tricks for plant creamy binders and structural alternatives that still deliver richness and stability. Below I give practical, tested swaps (with ratios), step-by-step mini-recipes (cashew cream, coconut cream), eggless crust approaches, and nut-free ideas — plus troubleshooting and notes on macros/allergies so you don’t accidentally blow your carb or allergy goals.
Quick overview (choose your path)
- Dairy-free binders: canned full-fat coconut milk or coconut cream; cashew cream (blended, soaked cashews). Use these in place of heavy cream + cream cheese. (46, 47)
- Eggless crusts: either omit the egg in cheese-based crusts (many keto cooks do this), or use coconut flour + psyllium or cauliflower crust approaches for structure. (48, 49)
- Nut-free crusts: cauliflower crust, coconut-flour + psyllium crust, or seed-based crust (sunflower/chia) — pick based on allergy profile and taste preferences. (50)
Dairy-free binders: Coconut milk vs cashew cream (how to use each)
Both are great, but they behave differently in texture and flavor.
Coconut milk/coconut cream — simple, shelf-stable
- What to use: canned full-fat coconut milk (or the thicker coconut cream). Coconut cream is richer and closer to heavy cream in mouthfeel. Refrigerate the can and skim the thick cream if needed. (51)
- Ratio to substitute: start by swapping 1:1 for liquid (e.g., 1 cup heavy cream → 1 cup full-fat coconut milk), then reduce by simmering if you need extra thickness.
- How to thicken: simmer to reduce 20–30% and/or add 1/8–1/4 tsp xanthan gum (pre-dispersed in a little cold liquid) to stabilize.
- Flavor note: coconut flavor is present — it pairs well with curry/Thai-style or savory herb pies, but may be noticeable in a classic Western herb pot pie. Use mascarpone-style techniques (add lemon, garlic, umami like parmesan or nutritional yeast) to balance. (52)
Mini method:
- Warm 1 cup canned full-fat coconut milk with 1 cup stock.
- Reduce gently to ¾ cup over medium-low heat.
- Whisk in 1–2 tbsp tahini or 2 tbsp blended soaked cashews (optional) for extra silk.
- Micro-thicken with 1/8 tsp xanthan (sprinkle pre-mixed into 1 tbsp cold liquid) if needed.
Cashew cream — neutral, silky, whole-food option
Cashew cream is made by soaking raw cashews and blending them with water until silky. It’s neutrally flavored and excellent for savory sauces.
Basic cashew cream (yields ~1 cup): soak 1 cup raw cashews in hot water 20–30 mins (or overnight cold), drain, then blend with ¾–1 cup warm water until ultra-smooth. Add a pinch of salt and 1 tsp lemon juice if desired. For a thicker binder, use less water (½ cup) and blend until silky. (53, 54)
How to use in a pot pie:
- Replace cream/cream-cheese combo with ¾ cup cashew cream + ½ cup chicken broth, simmer and whisk to emulsify. If you need to cling, add 1/8 tsp xanthan or simmer to reduce.
- Macro note: cashews contain carbs — measure and add the carb contribution to your recipe macro calculation (cashew cream will add some net carbs depending on the amount). Use smaller amounts if you’re targeting strict <20 g/day.
Pros: neutral flavor, silky texture; Cons: not nut-safe.
Dairy-free thickening tips
- Pre-disperse xanthan gum in a cold liquid (1/8 tsp in 1 tbsp water) to avoid clumping, then whisk into warm sauce — it will thicken quickly. (55)
- Combine reduction + cashew/coconut cream + micro-xanthan for the most stable, freezer-friendly dairy-free sauce.
Eggless fathead & egg-free crust alternatives
Fathead crust traditionally uses egg as a binder. If you need egg-free or are avoiding eggs, you have solid options.
1) Egg-free fathead approach (community tested)
- Many keto cooks omit the egg and rely on the melted cheese + almond flour + cream cheese combo to bind. The process is very similar: melt cheeses, mix with almond flour until a dough forms, chill briefly, and press/roll between parchment. The cheese acts as the glue.
Egg-free fathead mini method:
- 1½ cups shredded mozzarella, 2 tbsp cream cheese, ¾ cup almond flour, pinch salt. Melt cheeses gently, add almond flour, mix to a dough, chill 10–15 min, press between parchment and shape. Bake until golden.
Notes: texture will be chewier and more cheesy than egg-included dough; avoid over-handling.
2) Coconut-flour + psyllium husk crust (egg-free, dairy-free possible)
- Why it works: coconut flour + psyllium form a gel when hydrated with boiling water; this combination builds structure and can be used to make a pliable, egg-free crust. Recent recipes for vegan/keto pizza/crusts use this method successfully.
Starting ratio (test & adapt):
- 6–8 tbsp coconut flour, 2 tbsp psyllium husk powder, 1 cup boiling water (pour over dry mix), 2–3 tbsp oil (olive or melted coconut), pinch salt. Mix, shape, press into pan, bake ~12–15 min to set, then fill and finish baking.
Texture: more short/crisp than flaky; works well as a bottom crust or thin top sealed as a galette.
3) Cauliflower crust (nut-free + egg optional)
- Riced cooked cauliflower squeezed dry and combined with egg (or psyllium for eggless), a binder (parmesan or nutritional yeast for flavor) creates a sturdy, nut-free crust. This is ideal if you need a nut-free, lower-carb structural base. (56)
Simple cauliflower crust method (egg-free tweak):
- 3 cups riced, cooked cauliflower (well drained), 2 tbsp psyllium husk (or 1 egg if allowed), ¼ cup grated cheese or nutritional yeast, 1–2 tbsp oil, salt. Press thin on parchment and bake 12–18 mins until set, then add filling. If fully egg-free, use extra psyllium (and a splash of boiling water to activate) for binding.
Nut-free, seed-based crust ideas (for tree-nut allergies)
- Cauliflower crust (above) is the easiest nut-free option.
- Seed flour crust: ground sunflower seeds or pumpkin seeds (seed meal) + psyllium + oil can mimic almond flour crusts — toast seeds first to reduce bitterness and grind fine. (If you choose seed flours, test for cross-reactivity and recall that some seed meals darken in color.)
- Store-bought allergy crusts: if you prefer a neutral base and have access, some gluten-free crusts are made from tapioca/arrowroot — note these are higher carb, so recalculate macros.
Freezer, shelf life, and reheating — allergy-friendly notes
- Coconut-milk and cashew-cream sauces freeze and reheat OK, but may separate slightly; reheat gently over low heat while whisking, or blend with an immersion blender to re-emulsify. Avoid extremely high microwave heat. (57, 58)
- Coconut crusts or psyllium-based crusts hold up well to freezing (wrap tightly). Cauliflower crusts can become softer after freezing — crisp under the broiler for a minute when reheating.
Macros & allergy tradeoffs (short, practical)
- Cashew cream will add carbs — cashews are more carb-dense than coconut cream. If you use ½ cup cashew cream (~75–90 g cashews worth), add ~6–9 g net carbs to the total recipe (estimate; recalculation with your database). Use smaller amounts if strict.
- Coconut cream adds more fat and far fewer carbs than cashew cream, but brings coconut flavor. For strict keto, coconut cream is usually the safer macro choice.
- Psyllium husk is extremely low-carb and great for creating structure, but it’s highly absorbent — hydrate properly (often with boiling water) to avoid dry/dense crusts.
Troubleshooting quick checklist
- Sauce tastes coconutty, and you don’t want that: use half coconut milk + half cashew cream (if not allergic) or add an umami booster (soy sauce/tamari, nutritional yeast) and acid (lemon) to balance.
- Eggless fathead won’t hold shape: chill the dough thoroughly, or add 1 tbsp extra almond flour or 1 tsp psyllium to bind.
- Coconut-flour crust is crumbly: reduce coconut flour or add more oil/butter; coconut flour soaks up liquid quickly — add binding liquid slowly.
- Cauliflower crust soggy: Squeeze as much moisture as possible from cooked cauliflower (use cheesecloth or very fine sieve), pre-bake the crust before adding filling, and keep filling thick (less liquid).
Suggested snippet to use on your recipe
“Dairy-free keto pot pie: swap heavy cream for coconut cream or cashew cream; use a psyllium + coconut-flour or cauliflower crust for egg-free and nut-free options — and always pre-drain veggies and reduce your sauce so the pie won’t go soggy.”
Flavor Profiles & Add-Ins: Take Your Pot Pie Global
Want your keto chicken pot pie to taste like a trip around the world? Small changes in herbs, umami boosters, and cheese—or a drizzle of brown butter—will push this comfort classic from “homey” to “chef-level.” Below are tested flavor directions, exact add-in ideas, timing tips, and portion guidance so each twist stays balanced and keto-friendly.
Herb blends — pick a regional voice.
Herbs change everything. Use one of these blends depending on the mood you want:
- Classic American / Country: thyme + parsley + a whisper of sage. Use 1 tsp dried thyme + ½–1 tsp dried parsley + ¼ tsp dried sage per pie, or 1 tbsp fresh herbs total. Great for preserving the pot-pie “home” vibe.
- French (subtle, aromatic): tarragon + chives + parsley. Tarragon is bright and licorice-like — use sparingly (1–2 tsp fresh, or ¼–½ tsp dried). It pairs beautifully with creamy chicken. (59, 60)
- Herbes de Provence (rustic French): a mix of thyme, rosemary, marjoram, savory, and sometimes lavender — use 1 tsp for a savory floral lift. Works wonderfully with roasted chicken and mushrooms.
- Mediterranean: oregano + rosemary + lemon zest — for a roast-chicken/Greek vibe. Zest the lemon and add ½ tsp to brighten the heavy cream base.
- Asian twist: a touch of grated ginger, minced scallion, and cilantro folded into a lighter coconut-cream base for a Thai-inspired pot pie.
Tip: add half the herbs during cooking and the other half at the finish (off heat) to keep a fresh herb aroma. For dried→fresh swap, use roughly a 1:3 dried-to-fresh ratio.
Umami boosters — small amounts, massive payoff
Umami is the secret sauce of savory satisfaction — it makes your filling taste deeper without adding carbs. Add one or two of the following, in small amounts, to amplify savory notes:
- Mushrooms (shiitake, cremini, or porcini powder): sauté sliced mushrooms until golden (concentrates umami). For a meatier umami, use a tablespoon or two of dried porcini rehydration liquid. Mushrooms also add texture and pair well with thyme. (61)
- Bacon or pancetta: render until crisp, keep some fat in the pan to sauté onions/veg — fold crisp bits back into the filling (1–2 oz cooked per pie). Bacon adds smoky saltiness and fat that improve mouthfeel.
- Aged cheese (Parmesan) or Parmesan rind: toss a Parmesan rind into the sauce while simmering, then remove; it infuses umami without much carb. Grate 1–2 tbsp Parmesan into the filling for savory depth. (62)
- Tomato paste (1 tsp): a tiny hit caramelizes and deepens flavor; brown it in the pan briefly to remove rawness.
- Miso/fish sauce / Worcestershire: use carefully — ½–1 tsp miso (diluted) or ¼ tsp fish sauce adds savory backbone. These are potent; taste as you go.
- Mushroom powder or powdered umami blends: sprinkle ¼–½ tsp into the sauce for an instant savory lift without texture changes.
Why it works: umami compounds (glutamates, nucleotides) bind to savory taste receptors and make the overall dish feel richer and more complete. A little goes a long way.
Cheese choices — match melt, flavor, and function
Cheese does double duty in a keto pot pie: it adds fat for mouthfeel and can be structural (in crusts/toppings). Pick cheeses for what you want them to do.
- Cream cheese/mascarpone: best for thickening + silkiness. Add 1–2 oz melted into the sauce for cling and richness. Neutral flavor, great for creamy bases.
- Parmesan / Pecorino Romano: umami + savory grit. Use a rind to simmer in the sauce or 1–2 tbsp grated for depth (low moisture — won’t water down the filling). Great when combined with mushrooms.
- Gruyère / Comté / Fontina: melty, nutty, luxurious — ideal for a cheesy crust edge or shredded on top of a biscuit topping. Gruyère gives a toasty, slightly sweet nuttiness when browned.
- Sharp cheddar: bolder flavor & color — works well in biscuit/drop-biscuit toppings or mixed into the filling for a tangy punch. Use medium-sharp for balanced flavor.
- Mozzarella: stretch + chew — good in fathead crusts when you want pliability and browning.
- Blends: cream cheese + Parmesan + Gruyère = silky, umami-rich filling that still melts beautifully on reheating.
Cheese tips: Grate block cheese yourself (not pre-shredded) to avoid anti-caking agents that can affect the melt. Reserve a small handful to sprinkle on top of the crust/topping for attractive browning.
Small section — keto-friendly “brown butter” technique
Brown butter (beurre noisette) is one of the easiest ways to add a toasty, nutty depth that screams “comfort” — and it’s 100% keto. Use it sparingly as a flavor finish or to brown veg before building your sauce.
How to make brown butter (quick):
- Put 4 tbsp (½ stick) unsalted butter in a light-colored, heavy skillet over medium heat.
- Melt, then swirl occasionally as it foams; watch the milk solids — they’ll turn golden-brown and smell nutty in 3–5 minutes.
- Remove from heat immediately and pour into a cool bowl (stops the cooking). Strain if you want clear butter. Serious Eats and Bon Appétit both have step-by-step guides and emphasize watching closely so it doesn’t burn. (63, 64)
How to use brown butter in your keto pot pie:
- Finish the filling: stir 1–2 tbsp brown butter into the sauce off-heat to add a toffee-like nuttiness and glossy mouthfeel. Works especially well with sage or thyme.
- Brown your mushrooms/veg: sauté mushrooms or shallots in a little brown butter first to deepen flavor before adding broth.
- Crust trick: brush cooled brown butter on a fathead or almond-coconut crust before baking for a nutty color and extra flavor (use sparingly—adds fat but minimal carbs).
- Safety tip: brown butter can darken quickly; remove from heat at the first nutty aroma and transfer to a cool bowl to prevent burning.
Brown butter is a tiny finishing flourish that multiplies savory perception — perfect when combined with a sprinkle of Parmesan and fresh thyme.
Quick flavor-map examples (pick one and run with it)
- Rustic mushroom & thyme: brown butter → sauté cremini + shallots → add thyme + Parmesan rind → finish with mascarpone.
- Smoky bacon & cheddar: render bacon → use fat to sauté veg → add a little tomato paste + sharp cheddar in the sauce → top with cheddar drop biscuits.
- French tarragon chicken: fold fresh tarragon into cream-cheese base + white wine splash (small) → finish with lemon zest.
- Thai-inspired: use coconut cream base + grated ginger + fish sauce + cilantro finish — omit heavy cheeses and add lime at the end.
Portion & timing guidance (so flavors don’t overwhelm)
- Start small: add potent umami/condensed ingredients (miso, fish sauce, tomato paste) by ¼-tsp increments, tasting as you go.
- Hard cheeses (Parmesan) — 1–2 tbsp grated per pie is often plenty.
- Bacon/pancetta — 1–2 oz cooked per 9″ pie adds noticeable smoke without dominating.
- Brown butter — 1–2 tbsp for a 9″ pie; more will make the filling very rich.
Signature Recipe: The Complete Keto Chicken Pot Pie
This is the kitchen-tested, Keto Chicken Pot Pie you can cook tonight. It’s written for a 9-inch (23 cm) deep-dish pie that serves 6. I include exact weights (US + metric), a fathead top-crust plus a biscuit-topping option, step-by-step instructions, make-ahead/freezing notes, and micro-tips (egg-wash substitutes, sealing, how to avoid sogginess) (65, 66, 67)
Ingredients (serves 6)
All weights are given as US measure — then metric in parentheses.
Filling
- Cooked shredded chicken — 3 cups (≈ 450 g cooked)
- Unsalted butter — 2 tbsp (30 g)
- Yellow onion, finely chopped — 1 small (about 5 oz / 140 g)
- Celery, finely diced — 1 cup (120 g)
- Garlic, minced — 2 cloves (6 g)
- Riced cauliflower, drained and lightly sautéed — 1 cup (120 g)
- Frozen green beans or peas (optional — peas add carbs) — ½ cup (75 g)
- Chicken broth (low sodium) — 1 ½ cups (360 ml)
- Heavy cream — ¾ cup (180 ml)
- Cream cheese, softened — 1 oz (28 g)
- Xanthan gum — 1/8–1/4 tsp (start small)
- Fresh thyme, chopped — 1 tsp (or ¼ tsp dried)
- Fresh parsley, chopped — 1 tbsp (optional)
- Salt & black pepper — to taste (start with ¾ tsp salt)
- Optional umami: grated Parmesan — 2 tbsp (10–12 g)
Macro note: depending on crust choice and whether you include peas, expect roughly ~4–6 g net carbs per serving in a typical fathead-crust version (many popular keto recipes report similar ranges). For a lower-carb version, omit peas and increase cauliflower.
Fathead Top Crust (makes one top crust for a 9-inch pie)
- Shredded mozzarella — 1 ½ cups (approx. 150 g)
- Almond flour — ¾ cup (84 g)
- Cream cheese — 2 tbsp (30 g)
- 1 large egg, beaten — 1 egg (50 g)
- Baking powder — ¼ tsp
- Pinch salt
Alternative: Cheddar Drop-Biscuit Topping (makes ~8 biscuits)
- Almond flour — 1 ½ cups (150 g)
- Shredded sharp cheddar — 1 cup (100 g)
- Baking powder — 1 ½ tsp
- 2 large eggs — 2 eggs (100 g)
- 2 tbsp sour cream or Greek yogurt — 2 tbsp (30 g)
- Salt, garlic powder to taste
Equipment & time
- 9-inch (23 cm) deep-dish pie pan or 9×9 casserole.
- Medium sauté pan, medium saucepan.
- Mixing bowls, a whisk, and a rubber spatula.
- Parchment paper and rolling pin (for fathead crust).
- Oven: preheat at 400°F / 200°C for crust browning (you may reduce after initial browning).
Prep time: 25–35 minutes (if chicken is already cooked)
Cook time: 25–35 minutes (baking)
Total: ~1 hour from start (with cooked chicken)
Step-by-step instructions
Prep (0–15 minutes)
- Preheat oven to 400°F (200°C). If using a fathead crust, preheat a baking sheet to help crisp the bottom later.
- Prepare chicken — use 3 cups shredded rotisserie chicken or poach/roast breasts or thighs and shred (see earlier section on pros/cons). Reserve any pan juices for the stock if homemade.
- Par-cook veg — lightly sauté riced cauliflower in 1 tsp butter for 2–3 minutes and drain well. Blanch green beans if using. This reduces water and prevents a soggy filling.
Make the filling (10–15 minutes)
- In a medium sauté pan over medium heat, melt 2 tbsp butter. Add onion and celery; cook until soft (4–5 minutes). Add garlic and cook 30 seconds until fragrant.
- Add riced cauliflower and sauté 2 minutes. If using peas or green beans, stir them in now.
- Pour in 1 ½ cups chicken broth; bring to a gentle simmer and reduce for 2–3 minutes to concentrate flavor.
- Lower the heat to low. Stir in ¾ cup heavy cream and 1 oz cream cheese (cut into pieces) until smooth. If needed, use an immersion blender for an extra-silky base.
- Prehydrate xanthan: whisk 1/8 tsp xanthan into 1 tbsp cold broth, then whisk that into the warm sauce. Wait 30–60 seconds for thickening. Add thyme, salt, pepper, and Parmesan if using.
- Fold in shredded chicken and parsley; taste and adjust seasoning. Remove from heat and let cool 5–8 minutes (this prevents steam from sogging the crust).
Fathead crust method & assembly (15–20 minutes)
- Microwave (or double boiler) 150 g mozzarella + 2 tbsp cream cheese for 45–60 sec; stir until cohesive. Add beaten egg, ¾ cup almond flour, ¼ tsp baking powder, and a pinch of salt; mix into a dough. If sticky, chill 10 min.
- Place the dough between two sheets of parchment and roll it into a circle slightly larger than a pie pan. Transfer crust onto filling (or place filling into pan, then lay crust on top). Crimp edges to seal and vent with 3 small slits. Brush with beaten egg or heavy cream for shine (see micro-tips below).
- Place the pie on the preheated baking sheet and bake at 400°F / 200°C for 18–25 minutes until the crust is puffed and golden. If the crust browns too quickly, tent foil and continue until heated through.
Biscuit topping alternative (drop biscuits)
- Spoon filling into the pie dish and set aside.
- Mix biscuit topping: combine almond flour, baking powder, shredded cheddar, eggs, and sour cream into a sticky batter. Drop tablespoonfuls across filling (space evenly). Bake 18–25 minutes at 375–400°F / 190–200°C until biscuits are puffed and golden.
Rest & serve
Let the pie rest 10–15 minutes after baking so the sauce sets; this makes slicing cleaner and prevents the filling from running.
Make-ahead & reheating instructions
Make-ahead
- Filling only: Make filling up to 48 hours in advance; cool and refrigerate in an airtight container. Assemble and bake when ready.
- Assembled, unbaked pie: Assemble and wrap tightly; freeze up to 3 months. Thaw overnight in the fridge, then bake (add 10–20 minutes to bake time).
Reheating (from chilled)
- Preheat oven to 350°F / 175°C. Cover with foil and bake 20–25 minutes until heated through; remove foil last 5–8 minutes to re-crisp the crust. From frozen, thaw overnight then follow chilled reheating instructions, or bake at 350°F for 35–45 minutes (covered first).
Microwave: Not recommended for final reheating if you want a crisp crust; the microwave will make the crust soggy. If in a hurry, microwave the filling and crisp crust under the broiler for 1–2 minutes.
Micro-tips (egg wash substitutes, sealing crust, preventing sogginess)
- Egg wash substitutes: For a glossy golden finish, if you avoid egg, brush the top with heavy cream, melted butter, or olive oil before baking. Heavy cream gives a similar browning to egg wash.
- Seal the crust (avoid soggy edges): Chill the dough before placing on warm filling. For extra protection, brush the inside of the crust with beaten egg and briefly bake (blind-bake) 4–6 minutes before adding filling. You can also spread a thin layer of grated Parmesan inside the crust as a moisture barrier.
- Prevent sogginess: Par-cook and drain wet veg (especially cauliflower and zucchini). Reduce the broth/cream slightly before adding chicken so the sauce is thick and not watery. Let filling cool 5–10 minutes before topping with crust.
- Venting: Cut vents in the top crust (or leave small gaps) to allow steam escape — trapped steam is the main cause of a soggy top/dense crust.
- Avoid over-xanthan: Start with 1/8 tsp for the stated volume; a little xanthan goes a long way — too much = gummy texture.
- Bottom crisp trick: Bake assembled pie on a preheated baking sheet or pizza stone — direct heat crisps the bottom of the crust.
Quick troubleshooting (at-a-glance)
- Crust browned but filling still cold: tent foil and reduce oven temp to 350°F until center reaches 165°F (74°C).
- Filling too runny after cooling: reheat gently and whisk in 1 oz cream cheese or simmer to reduce.
- Dough tearing while rolling: chill 10–15 minutes; roll between parchment. Add a bit more almond flour if too sticky.
- Crust too oily/greasy: reduce cheese slightly in fathead or bake at slightly lower temp for a bit longer.
Nutrition & Macro Breakdown — per serving (recipe = 1 × 9″ pot pie, 6 servings)
Two versions: With peas (classic color) and Without peas (lower-carb).
Table columns: Calories | Total carbs | Fiber | Net carbs (= total − fiber) | Protein | Fat
(Numbers rounded to sensible precision; sources shown below.)
| Version (per serving) | Calories | Total carbs (g) | Fiber (g) | Net carbs (g) | Protein (g) | Fat (g) |
|---|---|---|---|---|---|---|
| With peas (est) | 495 kcal | 11.7 | 3.32 | ≈ 8.4 | 37.3 | 33.9 |
| Without peas (est) | 484 kcal | 9.94 | 2.68 | ≈ 7.3 | 36.6 | 33.8 |
How these were built: ingredient-level estimates were taken from standard nutrition sources (USDA / FoodData Central + common food databases) for the ingredients called in the recipe (cooked chicken, part-skim mozzarella, almond flour, heavy cream, cream cheese, riced cauliflower, onion, etc.). Representative ingredient sources: cooked chicken data, mozzarella, almond flour, and riced cauliflower are typical reference entries used to assemble the totals. (68, 69)
Crust contribution (fathead crust used in recipe)
The fathead-style top crust (mozzarella + almond flour + cream cheese + egg) makes a meaningful — but modest — contribution:
- Whole crust (entire pie): ~1,082 kcal, 25.6 g total carbs, 9.24 g fiber (net ≈ 16.4 g total for entire crust).
- Per serving (crust only): ~180 kcal, 4.27 g total carbs, 1.54 g fiber → ≈ 2.7 g net carbs per serving. (70)
Practical takeaway: if you remove the crust (crustless / casserole version), expect net carbs per serving to drop ≈ 2.7 g, and calories to drop by ~180 kcal (per serving) — a fast way to lower impact if you’re tight on carbs.
Portion size & ketosis (practical rules)
- Typical strict-keto range: many people target ~20–30 g net carbs/day to maintain steady ketosis; others use up to 50 g for a more flexible low-carb approach. If your target is 20 g/day, one serving with peas (~8.4 g net) would be ~42% of your daily allowance; without peas (~7.3 g) is ~36%. If you need more margin for snacks or other meals, either (A) go crustless (~4.6 g net per serving), or (B) split the pie into 8 smaller servings instead of 6. (71)
- Three quick portion strategies:
- Smaller slice — cut into 8 portions (instead of 6). That reduces per-slice calories and carbs by ~25% (good for calorie or carb control).
- Smaller crust — use half the crust recipe (or a thin parmesan seal) to shave ~1.3 g net carbs and ~90 kcal per serving. (Because crust adds ~2.7 g net per serving, halving it removes ~1.35 g net/serving.)
- Crustless casserole — the lowest-carb option: remove crust entirely to drop net carbs by ~2.7 g/serving (and drop ~180 kcal). Great for batch meal prep and stricter days.
How topping/ingredient swaps change the math (examples)
- Omit peas: saves roughly ~1.1 g net carbs/serving (compare the two versions).
- Swap cauliflower for more veg: cauliflower is very low-carb (≈ 5 g total carbs /100 g; ~2 g fiber), so increasing cauliflower in place of starchy bits is the most efficient carb-saver. (72)
- Use thinner crust, or biscuit instead: drop-biscuit toppings (cheddar/almond-based) will shift macros differently — generally similar net carbs to a fathead top per serving but vary by recipe; always recalc if you change amounts.
Notes on accuracy & sources
- These are estimates assembled from standard entries (USDA FoodData Central + commonly used nutrition databases). Exact macros will vary based on product brands (e.g., part-skim vs whole-milk mozzarella), how much liquid evaporates while cooking, and whether you include optional items (peas, Parmesan, bacon). For authoritative per-ingredient data, consult FoodData Central (USDA) and the product labels you actually use.
- Representative sources used in these calculations: FoodData Central (USDA) for poultry and dairy baseline values, a standard mozzarella database entry, almond-flour nutrition summaries, and a riced-cauliflower nutrition reference.
Quick “Keto 2.0” note
Some people follow a more flexible “Keto 2.0” or plant-forward low-carb approach that allows more carbs (e.g., ~20% of calories, which can be ~75–100 g carbs on a 2,000 kcal diet) so they can include more fruit/whole grains/legumes while emphasizing healthy fats. Under that model, a single serving of this pot pie is trivial to fit — but it may not reliably induce ketosis the way a strict <30 g/day plan does. Keto 2.0 advocates trade strict ketosis for sustainability and a bigger emphasis on whole plant foods. If you’re tracking ketosis (e.g., ketone strips, metabolic goals), keep strict counting — otherwise the looser approach can be healthy and more maintainable for some people. (73)
Final takeaways
- Per serving ≈ , 7–8.5 g net carbs, depending on whether you include peas — low enough for many keto plans.
- Crust ≈ 2.7 g net carbs/serving (fathead crust in recipe) — remove it to save carbs quickly.
- To lower carbs further: omit peas, increase cauliflower, or go crustless. For stricter days, cut the pie into 8 servings.
Make-Ahead, Batch Cooking & Freezing
Batch-cooking your Keto Chicken Pot Pie is a game-changer: you save time, lock in weekday dinners, and control portions. Below is a kitchen-friendly guide that covers the safest and highest-quality ways to prep, freeze, thaw, and reheat — plus shelf-life rules and food-safety temps so nothing surprises you in the middle of dinner.
Which to freeze: assembled pie vs. unbaked crust vs. filling only (best options ranked)
- Filling only (best balance of quality + convenience).
- Why: it freezes and reheats with the least textural loss. The crust (especially fathead or almond-coconut pastry) keeps much better when baked fresh. Freeze the cooled filling in airtight containers or portion trays; when you’re ready, thaw (or bake from frozen) and add fresh crust or drop biscuits before baking. This minimizes sogginess and maximizes crust texture. (74, 75)
- Assembled, unbaked pie (convenient, still very good).
- Why: You get all the convenience of a ready-to-bake pie. To protect crust texture, assemble in a disposable or freezer-safe pan, flash-freeze flat on a tray for 1–2 hours, then wrap tightly (plastic wrap + foil or vacuum seal). Thaw in the fridge overnight before baking so the crust and filling come to an even temperature. If baking from fully frozen, add 15–25 minutes to bake time and tent with foil if the top browns too fast. (76)
- Fully baked pie (least recommended for crust quality).
- Why: safe to freeze, but reheating often softens the crust and changes texture. If you do freeze a baked pie, crisp the bottom under direct heat (preheated baking sheet) and re-crisp the top under the broiler for a minute after reheating.
Packaging & labeling (practical steps)
- Cool completely before packing — heat in the package creates condensation and ice crystals that damage texture.
- Portion into single-serve containers or freeze in a 9″ dish, depending on whether you want meal prep or family dinners. Individual portions thaw faster and reheat more evenly.
- Wrap well: first plastic wrap (tight), then heavy-duty foil, or use vacuum sealing for the longest quality. Remove as much air as possible.
- Label with date & contents. Use a permanent marker and include instructions (e.g., “Thaw in fridge 24h; bake 350°F 25–30 min”).
- Flash freeze trick: place assembled pies or ramekins on a sheet pan in the freezer until firm (1–2 hours) before wrapping to keep shapes intact and speed freezing.
Freezer shelf life & fridge limits
- Freezer (0°F / −18°C): for best quality, freeze assembled or filling-only pies for up to 2–3 months. Food kept frozen below 0°F remains safe indefinitely, but quality (flavor/texture) declines over time.
- Refrigerator: cooked pot pie or filling can be stored safely 3–4 days in the fridge. Reheat to the safe internal temperature (see below) before eating. (77)
Thawing methods (safe options, ordered by preference)
- Refrigerator thawing (best): place frozen pie or portions in the fridge for 24 hours (small portions thaw faster). This keeps food at a safe, constant temperature and preserves texture. (78)
- Cold-water thawing: keep the pie in a fully sealed package and submerge it in cold water, changing water every 30 minutes. Cook immediately after thawing. Good if you forgot to defrost overnight.
- Microwave thawing: Use the defrost setting and rotate frequently, but cook immediately after microwave thawing because the edges heat and create bacteria-friendly zones. Not ideal for crust quality, but fast.
Do not thaw at room temperature (countertop) — that allows the danger zone (40°F–140°F / 4°C–60°C) where bacteria multiply.
Reheating: temps, times & techniques (to keep crust crisp and filling safe)
- Safety target: reheat leftovers and casseroles to an internal temperature of 165°F (74°C) as measured with a food thermometer — this is the standard for destroying most harmful bacteria. Casseroles and leftover chicken dishes fall into this category. (79, 80)
From thawed (fridge) assembled pie or filling:
- Preheat oven to 350°F (175°C).
- Cover loosely with foil to avoid over-browning, heat 20–30 minutes (depending on portion size) until center reaches 165°F; remove foil last 5–10 minutes to re-crisp the crust. For single portions, 15–20 min often suffices.
From frozen (unbaked assembled pie):
- Preheat oven to 375°F. Place pie on a preheated baking sheet, tent with foil, and bake 45–60 minutes (times vary by oven and dish). Remove foil and bake 10–15 minutes more to brown. Check center temp = 165°F. If the top browns too quickly, lower the temp and extend the time.
From frozen filling (baked fresh crust):
- Thaw overnight in fridge or reheat gently on stovetop in a covered skillet over low heat until steaming; spoon into prepared crust and bake 12–20 minutes until crust is golden and filling is 165°F. This method gives the best crust texture.
Quick microwave + crisp method (time-saving):
- Microwave filling or slice until hot (stir halfway). Transfer to an oven-safe dish and broil 1–2 minutes to crisp the crust/top. Use a thermometer to confirm 165°F. Microwaving the crust directly produces sogginess — avoid unless you finish under the broiler.
Refreezing & reheating frequency
- Avoid repeated reheating: the FDA and USDA advise reheating once and consuming rather than reheating multiple times. Each heat–cool cycle increases food-safety risk and degrades quality. If you have leftover reheated portions, refrigerate and consume within 24 hours rather than refreezing. (81)
Texture tips to preserve quality through freezing
- Par-cook and drain watery veg (cauliflower, zucchini) before freezing to avoid excess moisture and ice crystals. Pat dry — less water = less sogginess.
- Slightly under-thicken the sauce before freezing; it will firm up when chilled and reheat to a desirable consistency. If it’s too thin after reheating, whisk in a small knob of cream cheese or reduce on the stovetop briefly.
- Protect the crust: blind-bake a very thin bottom layer for assembled pies if you expect long freezing or want to avoid a wet bottom. Brush interior with a thin egg or melted butter layer and return to the oven 3–4 minutes to seal before adding filling. This creates a moisture barrier.
Meal-prep ideas and portioning for convenience
- Individual ramekins or silicone muffin pans: freeze single-serve pies for grab-and-go meals. They thaw faster and reheat more evenly.
- Sheet-pan flash freeze: portion filling into silicone molds, freeze solid on a tray, then transfer to labeled bags. Great for making “heat-and-fill” portions to top with fresh crust or cheddar biscuits. (82)
Quick food-safety checklist (copy for your recipe card)
- Cool filling completely (under 2 hours) before freezing.
- Thaw in fridge when possible; avoid countertop thawing.
- Reheat to 165°F (74°C) throughout before serving.
- Limit reheating cycles — reheat once and consume.
Variations & Spin-Off Recipes (to expand content)
Providing variations and giving people quick options for dietary needs and occasions. Below are five spin-offs with exact and cook-time notes you can paste into recipe cards.
Mini Pot Pies (ramekins) — great for single servings & meal prep
- Ingredient swaps/changes: Divide the standard filling into 6–8 individual ramekins; use 1/4–1/3 of the fathead dough (or one small biscuit) per ramekin. For portability, press small fathead rounds (~2–3 in / 5–7 cm) on top of each ramekin.
- Cook time/method: Bake at 400°F / 200°C for 12–18 minutes until crusts are golden (watch closely — small crusts brown faster). If using biscuit drop topping, reduce to 10–14 minutes.
- Micro-tip: Chill ramekins 10 minutes before unmolding/serving for cleaner presentation; flash-freeze on a sheet for easy single-serve frozen meals.
Pot Pie Soup (stew + biscuit) — spoonable comfort (no crust required)
- Ingredient swaps/changes: Increase broth to 3–4 cups (720–960 ml) and reduce cream to ¼ cup (60 ml) so the texture is a thick stew/soup. Add extra diced cauliflower and shredded chicken for the body; omit the top crust or use small cheddar drop biscuits served on the side.
- Cook time/method: Simmer filling on stovetop 10–15 minutes to meld flavors; if adding drop biscuits on top, ladle soup into oven-safe bowls and bake at 375°F / 190°C for 12–15 minutes to cook biscuits.
- Micro-tip: Finish each bowl with a sprinkle of fresh parsley and a tiny drizzle of browned butter for aroma.
Seafood Pot Pie — creamy, low-carb seafood twist
- Ingredient swaps/changes: Replace chicken with 2 cups mixed cooked seafood (shrimp, flaky white fish, lump crab — ~300–350 g total). Use fish or shellfish stock instead of chicken broth and omit peas; add 1–2 tbsp lemon juice and 1 tsp dill for brightness. Fold in 2 tbsp mascarpone instead of cream cheese for a silky, neutral base.
- Cook time/method: Because seafood cooks quickly, build the sauce first and add seafood at the end just to warm (2–4 minutes). Bake only to brown crust/topping: 375°F / 190°C for 10–15 minutes.
- Micro-tip: Avoid reheating seafood multiple times; cook/toast crust fresh and assemble right before serving for best texture and food safety.
Vegetarian Cauliflower Pot Pie (meatless) — hearty, low-carb vegetarian option
- Ingredient swaps/changes: Omit chicken; use 3 cups mixed vegetables: riced cauliflower (2 cups), sautéed mushrooms (1 cup), diced zucchini (1 cup). Boost protein/fat with 1 cup cubed firm tofu or 1/2 cup shredded halloumi (optional). Use vegetable broth and up mascarpone/cream cheese to 2–3 oz total for the body.
- Cook time/method: Sauté veg to concentrate flavor (8–10 minutes). Assemble and bake at 375°F / 190°C for 20–25 minutes (or 18–22 minutes for biscuit topping).
- Micro-tip: Add 1 tsp nutritional yeast to the sauce for cheesy umami without dairy (works well if keeping it partially vegan with cashew cream).
Buffalo Chicken Pot Pie — spicy, tangy crowd-pleaser
- Ingredient swaps/changes: Fold 1/3–1/2 cup (80–120 ml) buffalo sauce into the filling (reduce some broth to keep consistency). Replace thyme with 1 tsp ranch seasoning or 1 tbsp chopped chives. Use shredded cheddar drop biscuits as a topping for a melty, spicy contrast. Optional: swap half the chicken for shredded rotisserie dark meat for extra fat.
- Cook time/method: Assemble and bake at 375–400°F / 190–200°C for 18–25 minutes until biscuits are golden and filling bubbles.
- Micro-tip: Serve with a drizzle of blue cheese dressing or a dollop of ranch on the side for authenticity; tone down buffalo if feeding kids (try 1/4 cup buffalo sauce first).
Side Dishes & Serving Suggestions (keto-friendly)
Round out your keto chicken pot pie with sides that add freshness, texture, and color — while keeping carbs low. Below are quick, cook-tested ideas (ready-to-serve with times and tiny tips), plus a short note on wine & beer for non-keto guests.
Crisp salads — fast, bright, and low-carb
- Arugula + shaved Parmesan + lemon vinaigrette — peppery arugula contrasts with the rich pot pie. Dress just before serving (1 Tbsp olive oil + ½ tsp lemon zest + 1 Tbsp lemon juice + salt & pepper). Prep time: 3–5 minutes.
- Kale Caesar (light) — massage 2 cups chopped kale with 1 tsp olive oil, toss with a light Caesar dressing (yogurt or mayo base) and 1 Tbsp grated Parmesan. The chewy kale texture cuts through the creaminess nicely. Prep time: 6–8 minutes.
- Cucumber & radish salad — thinly sliced cucumber + radish, quick splash of apple-cider vinegar, salt, pepper, and fresh dill. Extremely low-carb and super-refreshing. Prep time: 5 minutes.
Riced broccoli — the “rice” that stays keto
- Why it works: Riced broccoli gives that light, grainy texture similar to rice but with far fewer carbs and more fiber (broccoli is a nutrient-dense choice). For nutrition references, the USDA shows broccoli is a low-calorie, low-carb veg.
- Quick method: pulse florets in a food processor until rice-sized, sauté 3–4 minutes in 1 Tbsp butter or olive oil with garlic and lemon zest. Finish with 1–2 Tbsp grated Parmesan. Cook time: ~8 minutes.
- Serve idea: spoon alongside a slice of pot pie to mimic the classic “pie + starch” dinner, but keep carbs low. (83, 84)
Roasted Brussels sprouts — crunchy, caramelized, crowd-pleasing
- Simple roast: halve sprouts, toss with olive oil, salt, pepper, and roast at 400°F (200°C) for 18–22 minutes until golden and crispy. For extra flavor, add 2 Tbsp chopped crisp bacon or 1–2 Tbsp toasted almonds (if nuts allowed).
- Flavor tweak: finish with a tiny drizzle (½ tsp) of balsamic reduction for brightness — use sparingly (balsamic carries sugar) or swap lemon juice for an acid lift to keep carbs minimal. Keto recipe collections commonly feature roasted Brussels as an easy side. (85)
Low-carb slaws — crunchy & picnic-ready
- Cabbage slaw with apple-cider vinaigrette: shredded green cabbage, thinly sliced green onion, chopped parsley; dressing = 2 Tbsp apple-cider vinegar + 1 Tbsp olive oil + salt + mustard. Very low-carb and stores well for a day.
- Creamy slaw: swap part of the mayo with Greek yogurt or sour cream, add celery seed, lemon, and a touch of sweetener if desired (erythritol/stevia) for a classic flavor without the sugar. Prep time: 10 minutes.
Quick pickles — tangy crunch in minutes
- Why quick pickles: A few tangy pickles can cut the pie’s richness and add a bright contrast. Quick-pickling (refrigerator pickles) is easy and fast — Bon Appétit’s method is a reliable template for hot-brine quick pickles (vinegar + salt + optional sugar or substitute). Pickles store well and are very low-carb when prepared without sugar. (86, 87)
- Fast cucumber pickle (5–15 min): whisk 1/2 cup white vinegar + 1/2 cup water + 1 tsp salt + 1 tsp sweetener (optional) and aromatics (dill, garlic). Pour over thinly sliced cucumbers and chill for≥15 minutes (or use hot brine to speed it). Ready-to-eat in under 30 minutes. Prep time: 10–15 minutes. (88)
Quick assembly & serving sequence (timing hack)
- Roast Brussels sprouts first (they take the longest).
- While sprouts roast, make riced broccoli and a quick salad.
- Assemble pot pie, rest 10–15 minutes after baking, plate with salad + a spoon of riced broccoli and roasted sprouts on the side. Add 1–2 pickle slices for brightness. This gives a balanced plate of fat, protein, and fiber — and looks great for photos (if you’re publishing).
Wine & beer notes for non-keto guests (brief)
- White wine picks: bright, dry whites like Sauvignon Blanc, Vinho Verde, or an unoaked Chardonnay cut through the creamy filling and refresh the palate. Wine Folly suggests these as solid chicken-pairing choices. (89, 90)
- Red wine options: a light-bodied Pinot Noir or a fruity Gamay works if guests prefer red; these won’t overpower the chicken.
- Beer: choose lighter, lower-alcohol styles such as pilsner or Belgian wit for approachable pairings; for heavier, cheesy variations (buffalo/cheddar), an amber ale or brown ale complements the fattier flavors. Reminder: beers are carb-rich vs. wine — mention to guests they’re not keto if they care.
- Serve tip: offer small pours (3–4 oz) so non-keto guests can sip without overdoing pours while everyone still enjoys the meal.
Troubleshooting: Common Pot Pie Problems & Fixes
Every pot pie has its quirks — but most problems have simple causes and quick fixes. Below are the usual suspects (soggy bottom, dense crust, runny filling, topping browns too fast) with root causes, immediate fixes you can do mid-bake or after the fact, and preventive steps to avoid the issue next time. Copy the mini-checklist at the end for a quick print-and-stick kitchen reminder.
Problem: Soggy bottom (the most common gripe)
What causes it
- Excess moisture in the filling (undrained riced cauliflower, zucchini, or unreduced broth).
- Steam trapped under the crust (no vents or crust placed on piping-hot filling).
- Bottom crust didn’t get enough direct heat (cold baking sheet or low oven placement).
Quick fixes (if you notice mid-recipe or straight after baking)
- If just baked and soggy: remove crust (if possible), spoon filling into a skillet and simmer over medium heat to evaporate excess liquid, then return to a blind-baked crust or crisp the crust separately on a sheet pan under the broiler for 1–2 minutes.
- Re-crisp: place slices on a preheated baking sheet in a hot oven (425°F / 220°C) for 6–10 minutes to evaporate moisture and crisp the bottom. Use convection if available for faster drying.
Preventive steps (best practice)
- Par-cook and drain wet veg. Sauté riced cauliflower, zucchini, or mushrooms; pat dry with paper towels.
- Reduce the sauce on the stovetop so it’s slightly thicker than you want—the filling firms when cooled.
- Blind-bake or seal the bottom. Blind-bake the bottom 5–8 minutes or brush the inside with beaten egg (or a little melted butter) and return to the oven 3–4 minutes to form a moisture barrier. A thin layer of grated Parmesan inside the shell also helps seal.
- Preheat a baking sheet or pizza stone and bake the assembled pie on that hot surface to crisp the bottom from the start.
- Cool slightly before slicing. Let the pie rest 10–15 minutes after baking to let the filling set.
Problem: Crust too dense or heavy
What causes it
- Overworking the dough (fathead or almond-coconut) compresses it.
- Too much almond or coconut flour (these absorb liquid and tighten the crumb).
- Not enough leavening (stale baking powder) or insufficient egg/binder.
Quick fixes
- If the crust is just baked too dense, slice thinner portions and serve warm with a dollop of butter or a cream-based sauce to soften the mouthfeel. Not much can be done to “fix” a fully baked dense crust, but warm moisture helps perception.
- For heavy biscuit toppings: reheat until warm and pair with an acid-y side (quick pickles or lemony salad) to brighten texture contrast.
Preventive steps
- Measure by weight. Almond & coconut flours vary by brand; use grams to avoid over-adding.
- Don’t overmix. Combine ingredients until they just come together—especially fathead dough.
- Check leavening. Replace baking powder every 6–12 months; add ¼–½ tsp more if dough seems dense.
- Chill dough 10–20 minutes before rolling—this relaxes gluten-free flours and makes the dough easier to handle without overworking.
- Add a tenderizer. For almond-coconut pastry, increase butter slightly or add 1 tsp vinegar/lemon to help a softer crumb.
Problem: Filling is too runny (before or after baking)
What causes it
- Sauce under-thickened (too little xanthan or cream cheese) or vegetables released liquid.
- Filling assembled while too hot — steam makes the crust soggy and the sauce thin as it cools.
- Overuse of watery veg (fresh peas, high-moisture zucchini) without pre-draining.
Quick fixes
- Stovetop recovery: Spoon filling into a saucepan, bring to a gentle simmer, and reduce until thickened; whisk in 1 oz (28 g) cream cheese or 1/8 tsp xanthan (pre-dispersed in cold liquid) to bind. Cool slightly before reassembling.
- Microwave + thicken: Warm filling in short bursts and whisk in 1 tbsp cream cheese or ½ tsp instant mashed cauliflower (just a pinch) to absorb moisture—then cool and re-top.
- Serve as pot-pie soup: If time’s short, turn the filling into a thickened stew and serve with cheddar drop biscuits on top or on the side.
Preventive steps
- Pre-thicken slightly on the stove—make the sauce a little thicker than you want; it thins with heat when combined with veggies.
- Use micro-thickeners carefully: 1/8–1/4 tsp xanthan is powerful—add incrementally. Pre-disperse in a little cold liquid to avoid clumping.
- Par-cook & drain veg thoroughly and pat dry, especially cauliflower and zucchini.
- Cool the filling 5–10 minutes before topping with the crust to let steam escape.
Problem: Topping (or edges) browns too fast while the center undercooks
What causes it
- Oven rack too high or too hot; the top elements in the oven are more intense than the internal heating.
- The filling is still cold and needs more bake time, while the exterior has already reached color.
- Crust is thin in places, causing uneven browning.
Quick fixes
- Tent loosely with foil: cover the crust with foil (don’t press it down) to slow browning and let the center catch up.
- Lower oven temp to 350°F (175°C) and continue baking until internal temp reaches 165°F (74°C).
- Move the pie to the lower rack so heat is more evenly distributed, and the bottom gets more direct heat.
- If the top is already dark, brush with a little melted butter or heavy cream and cover with foil to prevent further color change while the center finishes.
Preventive steps
- Start hot, finish moderate: for flakier browning, pre-bake crust (or start at 425°F for 8–10 minutes for crust color) then reduce to 350–375°F to finish cooking.
- Even thickness: roll crust evenly; use parchment to roll and transfer to avoid thin spots.
- Use vents and crimp edges carefully so steam escapes instead of puffing unevenly.
- If using convection: reduce temp by 25°F and watch closely—convection speeds browning.
Other common micro-problems & fixes
Crust cracks when slicing
- Cause: filling too hot or crust too rigid.
- Fix: let rest 10–15 minutes before slicing; use a serrated knife and a gentle sawing motion.
Crust oozes oil
- Cause: cheese in the fathead got too hot or over-fatty cheese.
- Fix: blot excess oil with a paper towel; bake a few minutes at a lower temperature to render and reabsorb.
- Prevention: use coarser-shredded cheese, reduce oven temp by 10–20°F, or add 1–2 tbsp extra almond flour to the dough to absorb oil.
Biscuits not rising / dense
- Cause: old baking powder or batter too wet/heavy.
- Fix: stir up a fresh quick-baking soda + acid lift? (Not ideal mid-bake.) For next time: check leavener freshness and use a lighter folding method.
- Prevention: test baking powder with hot water (it should fizz) and weigh flours.
Filling tastes flat
- Cause: under-seasoned or too much cream masking acidity/umami.
- Fix: finish with acid (lemon juice or a splash of vinegar), add salt, or fold in a small spoon of soy sauce/tamari or grated parmesan for umami.
- Prevention: season in layers — taste at each step (after sautéing veg, after sauce, before baking).
Quick Troubleshooting Table
| Problem | Quick fix | Preventive step |
|---|---|---|
| Soggy bottom | Reheat slices on a preheated sheet at 425°F for 6–10 minutes. | Par-cook & drain vegetables; blind-bake bottom; preheat baking sheet before using. |
| Dense crust | Warm & serve with butter — can’t fully fix baked density. | Don’t overmix; weigh flours; check leavener amounts; chill dough before baking. |
| Runny filling | Simmer and reduce; whisk in cream cheese or ~1/8 tsp xanthan gum to thicken. | Pre-thicken sauce; par-cook vegetables to remove excess water; cool filling before topping crust. |
| Top browns too fast | Tent with foil; lower oven temperature and move rack lower. | Start at a higher temp then lower it; roll an even crust; use vents or shield edges to prevent overbrowning. |
Mini checklist — before you bake (copy into recipe card)
- Drain and pat-dry all wet veg (cauliflower, zucchini).
- Reduce the sauce until it coats the spoon (slightly thicker than the final target).
- Preheat baking sheet or pizza stone.
- Blind-bake or seal the bottom if using a delicate crust.
- Cool filling 5–10 minutes before topping.
- Make vents in the top crust and tent with foil if it browns early.
If all else fails — a last-resort rescue plan
- Scoop the filling into individual oven-safe bowls, top with cheddar drop biscuits, and bake until biscuits are golden. It rescues flavor if the assembled pie texture fails.
- Or serve filling over crisp low-carb “toast” (parmesan crisps, toasted almond flour flatbread) for a composed plate.
Keeping these fixes and preventive steps handy will make your next (and every!) keto pot pie come out looking and tasting like the comfort classic you want—crispy, creamy, and worry-free.
The Bottom Line
Keto comfort food is absolutely possible — and delicious. This Keto Chicken Pot Pie keeps the creamy, savory heart of the classic while swapping the carb problems for low-carb alternatives that still deliver texture and flavor. Try the fathead crust if you want a flaky, traditional finish; use a biscuit topping if you prefer soft, cheesy bites; or go crustless for the simplest, quickest weeknight version. Whichever path you take, this pot pie belongs at your low-carb dinner table.
Frequently Asked Questions
Is a chicken pot pie allowed on keto?
Yes — when the crust and starchy veg are swapped for low-carb alternatives, and the sauce is thickened without flour. Many recipes report ~4–6 g net carbs per serving using these swaps.
What can I use instead of peas and carrots?
Great low-carb swaps include riced cauliflower, diced zucchini (blanched), green beans, and small amounts of diced turnip or parsnip if you track carbs closely.
Can I make this dairy-free?
Yes. Use full-fat coconut milk and cashew cream for creaminess, or experiment with blended cauliflower and olive oil. Note: some replacements will raise carbs slightly. (Always recalc macros.)
Will a fathead crust taste like regular pastry?
Texture and flavor are similar — it’s cheesy and slightly different from wheat pastry, but many people find it an excellent low-carb stand-in. For a flakier result, try an almond-coconut pastry method.
How do I avoid a runny filling?
Use a small amount of xanthan gum (a little goes a long way), simmer the filling to reduce liquid, or increase cream cheese slightly. Avoid adding too much starchy thickener if you want to keep carbs low.
Keto Comfort Foods: Family Favorite Recipes Made Low-Carb and Healthy
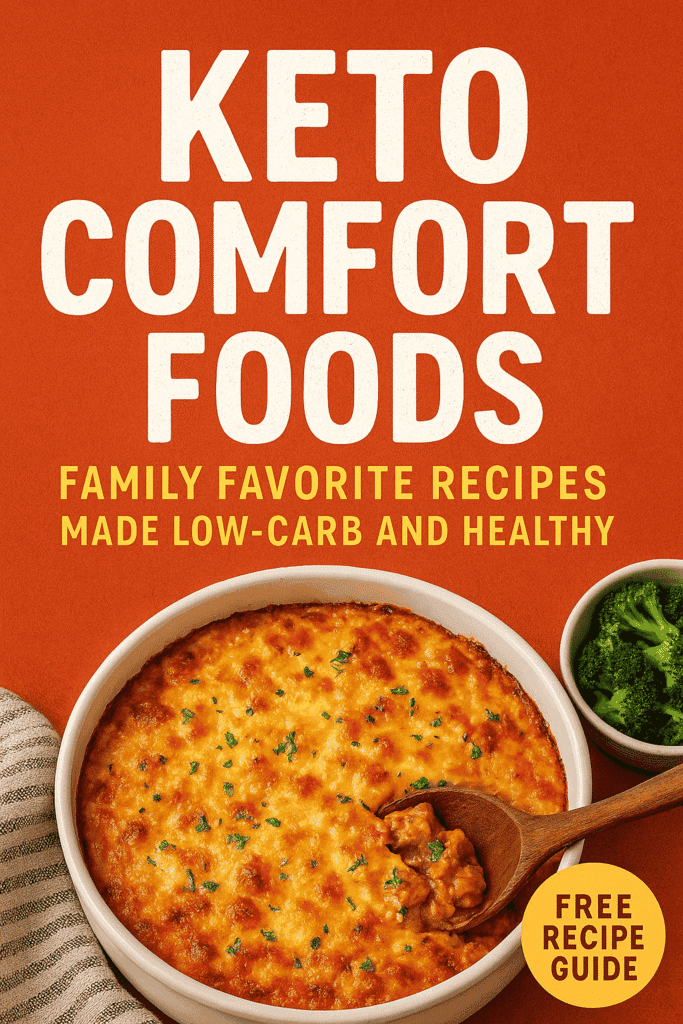
“Keto Comfort Foods: Family Favorite Recipes Made Low-Carb and Healthy” takes everything you love about homestyle comfort dishes and remakes them to fit a ketogenic lifestyle without sacrificing indulgence. This cookbook is a celebration of flavor, memory, and nourishment—175 recipes strong—designed to help you enjoy rich, satisfying meals while staying low in carbs and high in healthy fats. Whether you’re craving creamy casseroles, decadent desserts, classic breakfasts, or crowd-pleasing mains, this book shows that comfort food doesn’t have to mean carbs and sugar.
Why you’ll reach for this book again and again
This is not a clinical manual or a restrictive list of dos and don’ts—it’s a lovingly written collection that treats comfort food as part of life’s best moments. The author blends practical keto guidance (ingredients, pantry staples, tool recommendations) with stories about food’s role in family and celebration, making the book both useful and warm. Recipes are developed with real-world kitchens in mind: many include straightforward substitutions for pantry items, guidance on which sweeteners to use (and why), and tips on sourcing higher-quality fats, meats, and eggs. If you want to keep mealtime joyful while following a ketogenic approach, this book helps you do that sustainably—no deprivation, just smarter versions of the foods you already cherish.
What’s inside — practical, delicious, and family-friendly
You get more than recipes: the book opens with a thorough “Ketogenic Kitchen” primer that explains fats, proteins, vegetables, sweeteners, pantry essentials, and useful tools (from spiralizers to ice-cream makers). The recipe sections include Breakfast; Appetizers & Snacks; Soups, Salads & Sides; Main Dishes (organized by poultry, beef/lamb, fish/seafood, pork); Comfort Food Favorites; Sweet Endings; and Basics. Each recipe is annotated with nutritional info and “keto meters” that help you judge how often to enjoy a dish based on carb load—so you can plan holiday splurges and everyday meals with confidence. The result is a single volume that supports beginners and seasoned keto cooks alike.
Who this book is for
This cookbook suits anyone who wants to keep comfort and family meals central while following a low-carb, high-fat way of eating. It’s excellent for:
- Newcomers to keto who need a friendly, practical introduction and realistic meals.
- Parents who want safer, lower-sugar treats for kids without banning fun foods.
- Experienced keto cooks seeking creative comfort-food recipes and reliable technique notes.
- Home cooks who value flavor-first recipes that use whole foods and thoughtful ingredient swaps.
Taste without compromise
If you believe eating well shouldn’t mean eating boringly, this book proves you can have rich, nostalgic, satisfying meals while staying in ketosis. Maria Emmerich’s approachable voice, combined with tested recipes and clear kitchen guidance, makes this a go-to resource for weeknight dinners, holiday spreads, and everything in between. Treat yourself to a cookbook that restores pleasure to low-carb cooking—comfort foods remodeled so your family feels fed, satisfied, and a little bit spoiled (in the best way).


0 Comments